Wednesday, 19 September 2012

Beanies and Owls!

I've been going a bit mad over crochet hats at the minute and I have made another little one for the baby using a pattern I found on Ravelry.  It's a pattern by Alli from Alli Crafts called Button Flap Beanie.  She has loads of lovely hats and crochet patterns on her website.


I used a variegated yarn for this wee hat.  I was worried it might be a bit girly because of the light teals however Ian thought the opposite!!  It just goes to show how different people view different colours.  As I used a 4mm hook instead of the 5mm advised in the pattern I added an extra 'growing' row and an extra row to add more depth.

This pattern in so easy and quite adaptable for different sizes.  I've already made two of these and can see a few more being made over the next weeks for various babies!

A friend of mine quite likes owls and I spotted a crochet pattern on Pinterest which I thought she might like.  However, she's not that confident at crocheting so I thought I would give it a go.

                                                                      Source: lovethebluebird.blogspot.com via Shirlie on Pinterest


The pattern is from Love the Blue Bird and is relatively easy to follow.  I had some difficulty creating the ears and it took a few goes until I got it rightish!  My eyes are definitely wonky, to put it politely, but it was my first go at a french knot!  The small one turned out better and it's eyes are matching!!  I made it using embroidery thread and turned it into a small brooch for my friend.  


I think that these wee owls would look great on a mobile, though I should practice those french knots of the baby will think owl's eyes are two different sizes!!

Monday, 3 September 2012

Baby Project Boom!

The new baby will be here shortly - 3 weeks! Argh!! I think that is the best way to describe how I'm feeling!!  So I have been at a load of baby related projects.

I had crocheted a lovely soft, pastel baby blanket but then read a post about all baby things being pastel, so I thought that I would crochet a smaller but brighter blanket!

I fell in love with this pattern on Ravelry as all the projects looked gorgeous.  I was just on the lookout for some bright wool which I found on a recent trip to Dublin.  Here is the finished blanket...


I added a sort of granny stitch border around the edge of the blanket.  The first side a did is not that great but I couldn't be bothered re-doing it which I'll probably regret as it will annoy me!  Otherwise I love this pattern!  I think a scarf would look great in this style too, maybe in greys and creams.

The next project was re-covering the baby rocker.  We bought this for Charlie and he loved it but I hated the fabric from day one, but it was relatively cheap and was a great job.  I couldn't bear looking at it again so I set about re-covering it.

Before ...


I read a lot of different blogs about re-covering baby seats and quite liked the sound of the this tutorial from Ex Patria but when I started to follow her steps I just didn't have the skill to do it.  In the end I ripped the cover apart and sewed the fabric over the top of the different sections, then sewed it all together again.  

The hardest part was getting the slits for the straps in the right place, mine aren't really but they'll do the job.  Also the binding was tricky around the tight corners.  It was completed after a lot of stitch ripping!!!

After ...


It's definitely not perfect but I think it looks so much better.  Hopefully the baby enjoys it as much as Charlie did!

Saturday, 25 August 2012

Crochet Crazy

Well, I'm going a bit crochet crazy at the minute.  I've finally finished a larger blanket for the cot and I've started a smaller on for the car seat and moses basket.  I've also completed a tiny baby turban and a star hot pad.

I'm learning a few new stitches along the way.  Thank goodness for YouTube!  I also stumbled across a lovely Russian Pattern on Pinterest, which took me a while to decipher, as I'm not great at reading Russian or charts, but I think I cracked it.  I've no photo of it yet but I'll upload on shortly.

1. The Ripple Blanket


It took me a few goes to get this blanket started.  I had lots of bumpy bits, so after seeking advice on Ravelry I used a bigger hook to make the starting chain and this worked really well.

This is a free pattern from Ravelry.

I finished off the blanket with a border using a free tutorial from Yo Girl Yo, which I think looks great!


2. Mini Car Seat Granny Blanket

This one is still in progess but is getting there.  Again a free pattern from Ravelry.  I'm so plreased with the colours in this one.  The picture doesn't really do the colours justice, I must take one in the daylight.


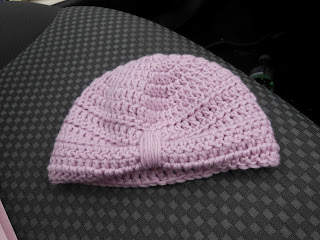
3. Baby Turban

Found this cute little pattern on Pinterest and really enjoyed crocheting it.  There are a few mistakes but you can't see them unless you know where they are!! ;)


4. Star Hot Pad

I found this pattern on Ravelry and quite liked the look of it.  It was quite straightforward once I checked out a how to video on You Tube.  The star stitch was relatively tricky but I think I mastered it well enough to finish the coaster. 

Friday, 27 July 2012

Gorgeous Tray

I saw this tray on Pinterest, pinned from Etsy.  It was made by Up in the Air Somewhere, who has some gorgeous pieces!  However the tray is out of my price range but I thought that I could reproduce something similar on my small budget!!


  1. I had this old tray in the cupboard already and didn't really like the pattern.  I used Plasti-Kote spray paint in cream and gold leaf colour.  
  2. I sprayed a coat of cream over the tray.  I took about 6 coats until there was a good even coverage.
  3. This was the most difficult part, and it took me a few goes before I got the pattern right.  I used a low adhesive tape my husband had in the house.  It didn't really have the best hold around the corners and bends of the tray, but otherwise was ok.
  4. After about 5/6 coats of gold spray, I peeled off the tape.  The gold has bled below the tape in a few places but I actually don't mind that.


Et voila...


I finished the tray by spraying it with a clear protective coat, again from Plasti-Kote.   Overall I spent £21 on spray.  They're not empty yet, so I have a few more projects out of them yet!

My tray doesn't have the same lustre as the original tray but I am really pleased with how it turned out!!

Wednesday, 4 July 2012

Addicted to Pinterest!

I haven't had a lot of time recently to make a lot but I am totally addicted to Pinterest!  Here are a few of the things I have seen and then created my own version - however my To Do board on Pinterest is massive and will probably take me years to work through!!

I'm loving paint chip cards and have been using them to decorate presents and cards.  I saw these little notebooks...


and thought I'd make my own.  I lined the inside of the cards with some scrapbook paper to make it a bit nicer and stained the sides of the paper with pink to match the card.  I also used an eyelet to join the notebook instead of a brad as I felt it was a bit sleeker.  I've added the name of the person I was giving the notebook too using a Dymo label maker.


Also saw these carnation arrangements ...


Source: ftd.com via Shirlie on Pinterest

...and loved them, even though I normally dislike carnations.  I thought I'd have a go and headed off to Tesco for cheap carnations, however, there were none and so I bought yellow daisy like flowers (not sure what they are called) and created my own version.  I used an old enamel bowl I found on my Dad's farm and filled it with oasis then bunged in the flowers.  It's not maybe as rounded as I had hoped but I think it would make a nice spring/summer table arrangement. 


Ok, blog sorted, now off to Pinterest for more ideas!!

Saturday, 21 January 2012

What I've been at!

I haven't blog anything in ages!! However I have been busy! Here's a few of the thing's I've been up to in the past 5months.

A crocheted dino hat for Charlie. Found the pattern on Etsy. It's by the Fuzzy Noggin (pattern) It was really easy to follow and I adapted it to make a flower hat for my niece.

Charlie and I also made a few salt dough decoration for gifts. He put his thumb print in the middle of each shape, which he loved, and then we stamp 'Merry Christmas' onto them. The only hassle was painting them but I quite liked them and think we'll try this again. I put the date on the back.


This is Charlie's finished quilt! Finally!! I bought the fabric in 2009 but only got round to starting it during the Summer 2011! Karen from Fiddlesticks Fabrics in Ballyclare helped me to sort out the design and make it. I really enjoyed it! I've appliqued a car on the back and quilted it with cars and buses! I'll upload a few close ups at some point!

It was great going to the classes as it meant I was able to get time to work on it. It's my first quilt and I'm pleased with how it turned out. Of course it's a bit rough round the edges, literally, in some places but thankfully Charlie can't quilt yet so hasn't noticed!!!

As you can see Charlie loves it though I'm terrified of him being sick on it!!


Friday, 22 July 2011

Memory Boxes


Two of the girls in work retired this year and to help them remember the times that they had with us we created some Memory Boxes. I 'scrapbooked' the lids of the boxes, personalised with their initials.


The girls loved their boxes and hopefully they won't forget us!!